资讯专栏INFORMATION COLUMN

小编写这篇文章的目的,主要是给大家讲解一下,关于实现配置热加载的方法,具体是怎么操作呢?下面就给大家详细的解答下。
背景
由于最近有相关的工作需求,需要进行增添相关的新功能,实现配置热加载的功能。所谓的配置热加载,也就是说当服务收到配置更新消息之后,我们不用重启服务就可以使用最新的配置去执行任务。
如何实现
下面我分别采用多进程、多线程、协程的方式去实现配置热加载。
使用多进程实现配置热加载
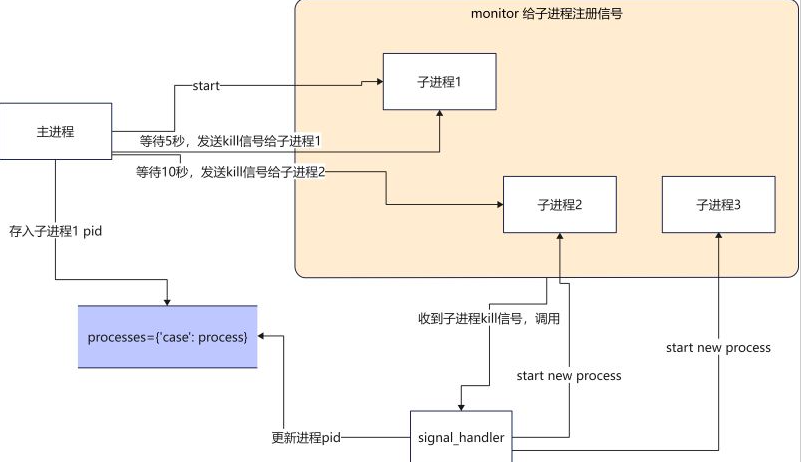
如果我们代码实现上使用多进程,主进程1来更新配置并发送指令,任务的调用是进程2,如何实现配置热加载呢?
使用signal信号量来实现热加载

当主进程收到配置更新的消息之后(配置读取是如何收到配置更新的消息的?这里我们暂不讨论),主进程就向进子程1发送kill信号,子进程1收到kill的信号就退出,之后由信号处理函数来启动一个新的进程,使用最新的配置文件来继续执行任务。
main函数
  def main():
  #启动一个进程执行任务
  p1=Process(target=run,args=("p1",))
  p1.start()
  monitor(p1,run)#注册信号
  processes["case100"]=p1#将进程pid保存
  num=0
  while True:#模拟获取配置更新
  print(
  f"{multiprocessing.active_children()=},count={len(multiprocessing.active_children())}\n")
  print(f"{processes=}\n")
  sleep(2)
  if num==4:
  kill_process(processes["case100"])#kill当前进程
  if num==8:
  kill_process(processes["case100"])#kill当前进程
  if num==12:
  kill_process(processes["case100"])#kill当前进程
  num+=1
signal_handler函数
  def signal_handler(process:Process,func,signum,frame):
  #print(f"{signum=}")
  global counts
  if signum==17:#17 is SIGCHILD
  #这个循环是为了忽略SIGTERM发出的信号,避免抢占了主进程发出的SIGCHILD
  for signame in[SIGTERM,SIGCHLD,SIGQUIT]:
  signal.signal(signame,SIG_DFL)
  print("Launch a new process")
  p=multiprocessing.Process(target=func,args=(f"p{counts}",))
  p.start()
  monitor(p,run)
  processes["case100"]=p
  counts+=1
  if signum==2:
  if process.is_alive():
  print(f"Kill{process}process")
  process.terminate()
  signal.signal(SIGCHLD,SIG_IGN)
  sys.exit("kill parent process")
完整代码如下
  #!/usr/local/bin/python3.8
  from multiprocessing import Process
  from typing import Dict
  import signal
  from signal import SIGCHLD,SIGTERM,SIGINT,SIGQUIT,SIG_DFL,SIG_IGN
  import multiprocessing
  from multiprocessing import Process
  from typing import Callable
  from data import processes
  import sys
  from functools import partial
  import time
  processes:Dict[str,Process]={}
  counts=2
  def run(process:Process):
  while True:
  print(f"{process}running...")
  time.sleep(1)
  def kill_process(process:Process):
  print(f"kill{process}")
  process.terminate()
  def monitor(process:Process,func:Callable):
  for signame in[SIGTERM,SIGCHLD,SIGINT,SIGQUIT]:
  #SIGTERM is kill signal.
  #No SIGCHILD is not trigger singnal_handler,
  #No SIGINT is not handler ctrl+c,
  #No SIGQUIT is RuntimeError:reentrant call inside<_io.BufferedWriter name='<stdout>'>
  signal.signal(signame,partial(signal_handler,process,func))
  def signal_handler(process:Process,func,signum,frame):
  print(f"{signum=}")
  global counts
  if signum==17:#17 is SIGTERM
  for signame in[SIGTERM,SIGCHLD,SIGQUIT]:
  signal.signal(signame,SIG_DFL)
  print("Launch a new process")
  p=multiprocessing.Process(target=func,args=(f"p{counts}",))
  p.start()
  monitor(p,run)
  processes["case100"]=p
  counts+=1
  if signum==2:
  if process.is_alive():
  print(f"Kill{process}process")
  process.terminate()
  signal.signal(SIGCHLD,SIG_IGN)
  sys.exit("kill parent process")
  def main():
  p1=Process(target=run,args=("p1",))
  p1.start()
  monitor(p1,run)
  processes["case100"]=p1
  num=0
  while True:
  print(
  f"{multiprocessing.active_children()=},count={len(multiprocessing.active_children())}\n")
  print(f"{processes=}\n")
  time.sleep(2)
  if num==4:
  kill_process(processes["case100"])
  if num==8:
  kill_process(processes["case100"])
  if num==12:
  kill_process(processes["case100"])
  num+=1
  if __name__=='__main__':
  main()
执行结果如下
  multiprocessing.active_children()=[<Process name='Process-1'pid=2533 parent=2532 started>],count=1
  processes={'case100':<Process name='Process-1'pid=2533 parent=2532 started>}
  p1 running...
  p1 running...
  kill<Process name='Process-1'pid=2533 parent=2532 started>
  multiprocessing.active_children()=[<Process name='Process-1'pid=2533 parent=2532 started>],count=1
  processes={'case100':<Process name='Process-1'pid=2533 parent=2532 started>}
  signum=17
  Launch a new process
  p2 running...
  p2 running...
  multiprocessing.active_children()=[<Process name='Process-2'pid=2577 parent=2532 started>],count=1
  processes={'case100':<Process name='Process-2'pid=2577 parent=2532 started>}
  p2 running...
  p2 running...
  multiprocessing.active_children()=[<Process name='Process-2'pid=2577 parent=2532 started>],count=1
  processes={'case100':<Process name='Process-2'pid=2577 parent=2532 started>}
  p2 running...
  p2 running...
  multiprocessing.active_children()=[<Process name='Process-2'pid=2577 parent=2532 started>],count=1
  processes={'case100':<Process name='Process-2'pid=2577 parent=2532 started>}
  p2 running...
  p2 running...
  kill<Process name='Process-2'pid=2577 parent=2532 started>
  signum=17
  Launch a new process
  multiprocessing.active_children()=[<Process name='Process-2'pid=2577 parent=2532 stopped exitcode=-SIGTERM>],count=1
  processes={'case100':<Process name='Process-3'pid=2675 parent=2532 started>}
  p3 running...
  p3 running...
  multiprocessing.active_children()=[<Process name='Process-3'pid=2675 parent=2532 started>],count=1
总结
好处:使用信号量可以处理多进程之间通信的问题。
自媒体培训
坏处:代码不好写,写出来代码不好理解。信号量使用必须要很熟悉,不然很容易自己给自己写了一个bug.(所有初学者慎用,老司机除外。)
还有一点不是特别理解的就是process.terminate()发送出信号是SIGTERM number是15,但是第一次signal_handler收到信号却是number=17,如果我要去处理15的信号,就会导致前一个进程不能kill掉的问题。欢迎有对信号量比较熟悉的大佬,前来指点迷津,不甚感谢。
采用multiprocessing.Event来实现配置热加载
实现逻辑是主进程1更新配置并发送指令。进程2启动调度任务。
这时候当主进程1更新好配置之后,发送指令给进程2,这时候的指令就是用Event一个异步事件通知。
直接上代码
  scheduler函数
  def scheduler():
  while True:
  print('wait message...')
  case_configurations=scheduler_notify_queue.get()
  print(f"Got case configurations{case_configurations=}...")
  task_schedule_event.set()#设置set之后,is_set为True
  print(f"Schedule will start...")
  while task_schedule_event.is_set():#is_set为True的话,那么任务就会一直执行
  run(case_configurations)
  print("Clearing all scheduling job...")
  event_scheduler函数
  def event_scheduler(case_config):
  scheduler_notify_queue.put(case_config)
  print(f"Put cases config to the Queue...")
  task_schedule_event.clear()#clear之后,is_set为False
  print(f"Clear scheduler jobs...")
  print(f"Schedule job...")
  完整代码如下
  import multiprocessing
  import time
  scheduler_notify_queue=multiprocessing.Queue()
  task_schedule_event=multiprocessing.Event()
  def run(case_configurations:str):
  print(f'{case_configurations}running...')
  time.sleep(3)
  def scheduler():
  while True:
  print('wait message...')
  case_configurations=scheduler_notify_queue.get()
  print(f"Got case configurations{case_configurations=}...")
  task_schedule_event.set()
  print(f"Schedule will start...")
  while task_schedule_event.is_set():
  run(case_configurations)
  print("Clearing all scheduling job...")
  def event_scheduler(case_config:str):
  scheduler_notify_queue.put(case_config)
  print(f"Put cases config to the Queue...")
  task_schedule_event.clear()
  print(f"Clear scheduler jobs...")
  print(f"Schedule job...")
  def main():
  scheduler_notify_queue.put('1')
  p=multiprocessing.Process(target=scheduler)
  p.start()
  count=1
  print(f'{count=}')
  while True:
  if count==5:
  event_scheduler('100')
  if count==10:
  event_scheduler('200')
  count+=1
  time.sleep(1)
  if __name__=='__main__':
  main()
  执行结果如下
  wait message...
  Got case configurations case_configurations='1'...
  Schedule will start...
  1 running...
  1 running...
  Put cases config to the Queue...
  Clear scheduler jobs...
  Schedule job...
  Clearing all scheduling job...
  wait message...
  Got case configurations case_configurations='100'...
  Schedule will start...
  100 running...
  Put cases config to the Queue...
  Clear scheduler jobs...
  Schedule job...
  Clearing all scheduling job...
  wait message...
  Got case configurations case_configurations='200'...
  Schedule will start...
  200 running...
  200 running...
总结
使用Event事件通知,代码不易出错,代码编写少,易读。相比之前信号量的方法,推荐大家多使用这种方式。
使用多线程或协程的方式,其实和上述实现方式一致。唯一区别就是调用了不同库中,queue和event.
  #threading
  scheduler_notify_queue=queue.Queue()
  task_schedule_event=threading.Event()
  #async
  scheduler_notify_queue=asyncio.Queue()
  task_schedule_event=asyncio.Event()
综上所述,就是小编给大家总结的,关于python方面的一些知识了,希望可以给大家带来帮助。
文章版权归作者所有,未经允许请勿转载,若此文章存在违规行为,您可以联系管理员删除。
转载请注明本文地址:https://www.ucloud.cn/yun/128005.html
摘要:而热部署技术能够帮助开发人员减少重新部署的等待时间。本文的目的为调研热部署的技术现状及其对开发效率的帮助,并简单梳理其技术实现的难点。热部署技术总结热部署目前有多种技术实现官方开源商业。 开发、自测、联调期间代码可能会被频繁地修改,通常即使只增加了一行代码,都需要重启容器以检查执行效果。而热部署技术能够帮助开发人员减少重新部署的等待时间。本文的目的为调研热部署的技术现状及其对开发效率的...
时间:2017年12月01日星期五说明:本文部分内容均来自慕课网。@慕课网:http://www.imooc.com 教学源码:无 学习源码:https://github.com/zccodere/s... 第一章:课程介绍 1-1 课程介绍 热部署的使用场景 本地调式 线上发布 热部署的使用优点 无论本地还是线上,都适用 无需重启服务器:提高开发、调式效率、提升发布、运维效率、降低运维成本 前置...
摘要:在项目根目录下创建,通过这个文件来起服务。到这里为止,自动刷新的内容基本讲完了。注意到一点,目前自动刷新都是刷新整个页面。其中表示热加载模块,表示。后续我还会进行更深入的学习,希望和大家共同进步。 本文主要介绍以下两方面的内容: webpack-dev-server自动刷新 热加载(Hot Module Replacement) 自动刷新 webpack-dev-server提供了...
摘要:热加载代表的是我们不需要重启服务器,就能够类检测得到,重新生成类的字节码文件无论是热部署或者是热加载都是基于类加载器来完成的。验证阶段字节码文件不会对造成危害准备阶段是会赋初始值,并不是程序中的值。 一、SpringBoot入门 今天在慕课网中看见了Spring Boot这么一个教程,这个Spring Boot作为JavaWeb的学习者肯定至少会听过,但我是不知道他是什么玩意。 只是大...
阅读 1044·2023-01-14 11:38
阅读 1041·2023-01-14 11:04
阅读 872·2023-01-14 10:48
阅读 2329·2023-01-14 10:34
阅读 1116·2023-01-14 10:24
阅读 1007·2023-01-14 10:18
阅读 635·2023-01-14 10:09
阅读 709·2023-01-14 10:02